 This is Part 1 in a series of tutorials that will show you how to build a Bussmann RTMR fuse/relay block. If you’re not familiar with this product, it’s a simple waterproof enclosure that allows you to connect accessories on your vehicle through relays and/or fuses.
After reading this tutorial, you will have the knowledge and skills to build one of the above fuse blocks that you can then install in your vehicle. This will end up being the foundation that you can then add accessories to such as lights, compressors, radios, and more.
This part will introduce you to the Bussmann RTMR and hopefully answer some questions. By the end of this part, you should have a better understanding of what this device is capable of and if it’s something that you need. I’ll explain many details, but let me first outline the upcoming parts in this series.
- Part 1 – Introduction
- Part 2 – Parts
- Part 3 – Tools and Techniques
- Part 4 – Wiring and Schematics
- Part 5 – Building The RTMR
- Part 6 – Installation
Before proceeding, a word of warning. I take no responsibility for damage, accidents, or injuries resulting from the fabrication or installation of any electrical modifications to your vehicle. You do so at your own risk.
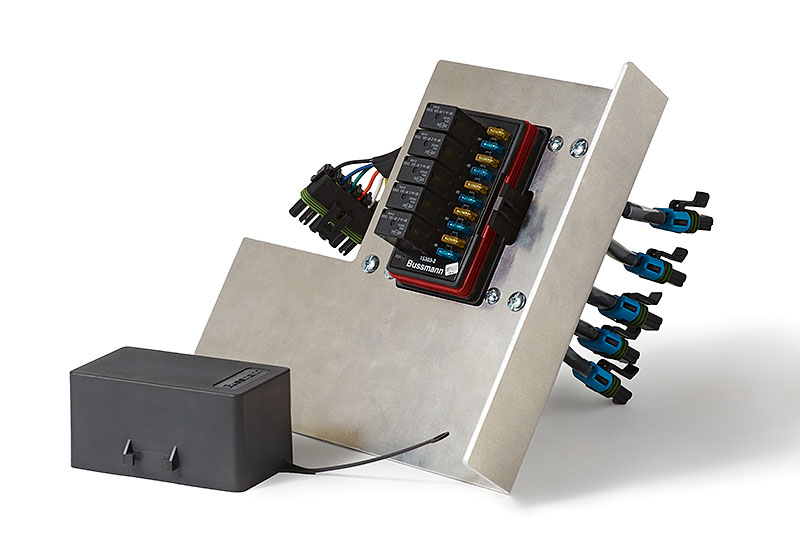
What is the Bussmann RTMR?
In simple terms, the Bussmann RTMR is a fuse/relay block. Although the manufacturer, Cooper Industries, which is part of Eaton, calls it a Power Distribution Module. This serves as a central connection point for various accessories in your vehicle. The device consists of fuses and relays to accommodate switched and non-switched accessories.
There is additional info at Cooper Industries website regarding the RTMR, most specifically within the datasheet. We’ll take a look at the datasheet as we proceed through this tutorial. For now, here’s the specific webpage for the Bussmann RTMR 15300 Series Power Distribution Module.
The RTMR is an acronym for “Rear Terminal Mini Fuse and Relay”. What this means is that the device allows you to insert terminals into the rear side with mini fuses and relays inserted into the front. It’s a weather tight enclosure(IP66), when used with appropriate cover, cable seals and cavity plugs. Additionally, there are several models with various configurations of internal electrical bussing. Out of the available models, there are really only two that I feel are the most versatile. I’ll detail the differences in Part 2 – Parts.
Why would I want one?
The primary reason to make one of these enclosures is if you want to add accessories to your vehicle, such as lights, compressors, radios, water pumps, etc. Of course, all of this is possible without using an enclosure such as the RTMR. However, as you continue to add accessories to your vehicle, the organization of the wiring can quickly get out of hand. Take a look at the following image. This is a vehicle with poor electrical organization. Although connected directly to the battery, the wires are all over the place, and it’s a potential fire hazard. The RTMR will clean this up nicely.
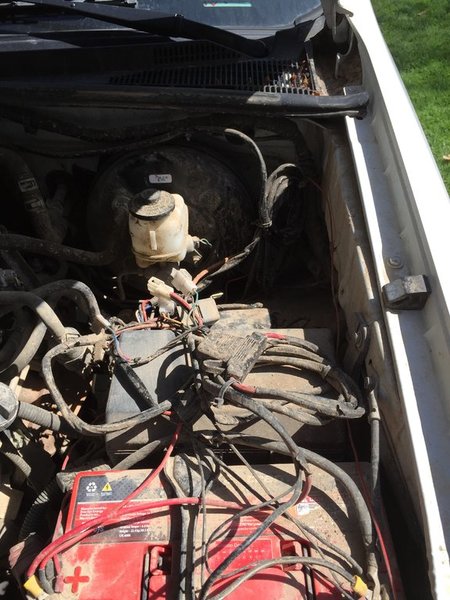
Photo by Shmellmopwho. He has since cleaned his wiring up with an auxilliary fuse block and circuit breaker.
Besides clean wiring, using an RTMR prevents you from having to branch off the OEM stock fuse block using fuse-taps. Of course this can be done, but you have to be very careful that you don’t overload a circuit, creating another potential fire hazard.
And finally, another safety feature of the RTMR is the use of relays. By routing the high-current accessory through a relay instead of directly through a switch, you’re minimizing the amount of current at your fingertips. If you don’t quite understand how relays work, I’ll get into more detail in Part 4 – Wiring and Schematics.
Why build it myself? Can’t I just buy one already made?
There’s an old proverb, “Give a man a fish, and he’ll eat for a day. Teach a man to fish, and he’ll eat for a lifetime.” I definitely fall into the latter camp, and I encourage you to do the same. By taking the time to read this tutorial and learning how this box is put together, you’ll learn a lot of the basics about electricity as well as how all of your accessories are installed in your vehicle. This will serve you well, especially if you’re out on the trail offroading and you need to trouble-shoot a problem. Additionally, you’ll save a few dollars over the long haul when it comes to installation of additional accessories. With the RTMR in place, your foundation will be setup. Adding a new accessory is practically plug-and-play.
Building a RTMR fuse/relay block is not beyond your ability. Anyone who puts in the time can build one. If you like working with your hands and solving problems, you can do this. If you’re willing to make mistakes and learn from them, you can do this. If you want to be self-sufficient, you can do this. Building one of these fuse blocks is not difficult. It just takes a bit of time and patience.
However, if you’re uncertain, hesitant, unskilled or impatient to take on this project yourself, you have options. Several vendors are selling this enclosure pre-built or selling something similar. Here’s a list I’ve gathered together.
- SPOD
- Trail Toys NSA Switch Panel
- PMA 4×4
- Painless Performance
- Blue Sea (fuse blocks only, no relays)
- Bussmann RTMR from I8Mud.com forum member
- Bussmann RTMR from Tacoma World forum member, Yotamac
In Part 2 – Parts, I’ll outline all of the parts needed to build the RTMR.