
Configuring pfSense as a VPN Client to Private Internet Access(PIA) is relatively easy. However, there are a few things to watch out for, especially after pfSense version 2.1.1. In this tutorial, I’ll show you how.
There are a few other tutorials available around the internet, but I feel that some are severely inaccurate or missing a couple key steps. When I was configuring my setup, I could not find a single tutorial that was complete and accurate. As a result, I had to piecemeal everything together to get it to work.
Additionally, pfSense changed some of the code in version 2.1.1 with regards to Outbound NAT rules to OpenVPN interfaces. Beforehand, things were a bit easier. But starting with version 2.1.1, there are additional configuration settings that need to be set. It’s not that big of a deal. Before it was automatic. Now it’s manually configured.
Anyway, I am going to break this down into a step-by-step process without any explanation along the way. Then afterwards, I’ll do my best to explain a few details and to highlight what change was made in pfSense 2.1.1.
This tutorial assumes the following:
- You have a current subscription to Private Internet Access with a valid username and password.
- You are using pfSense version 2.1.1 or newer
- You have pfSense setup and configured as a base installation with a single WAN interface connected to a modem and a single LAN interface with one or more clients.
- Firewall LAN rules have a default “Allow All”. (I know that this is not best practice, but after following this tutorial, you can then revise your firewall LAN rules accordingly.)
Also note that I will be referencing Private Internet Access as PIA throughout the tutorial.
Getting Started
We need to acquire a few things first. Start by downloading openvpn.zip from Private Internet Access. This supplies their ca.crt file and .ovpn files, which include the names of their servers. You won’t be using any of the .opvn files directly, but you can view them in a text editor to get the name of a specific server you want to connect to. Additionally, you’ll need your username and password, which were provided to you by PIA. We’ll be using these later.
Next, log into your pfSense administration panel. Now let’s go through the following steps in greater detail:
- Create CA Certificate
- Create password file to store your PIA username and password
- Create/configure an OpenVPN Client
- Create/configure an OpenVPN interface
- Configure Outbound NAT rules
- Verify OpenVPN Service
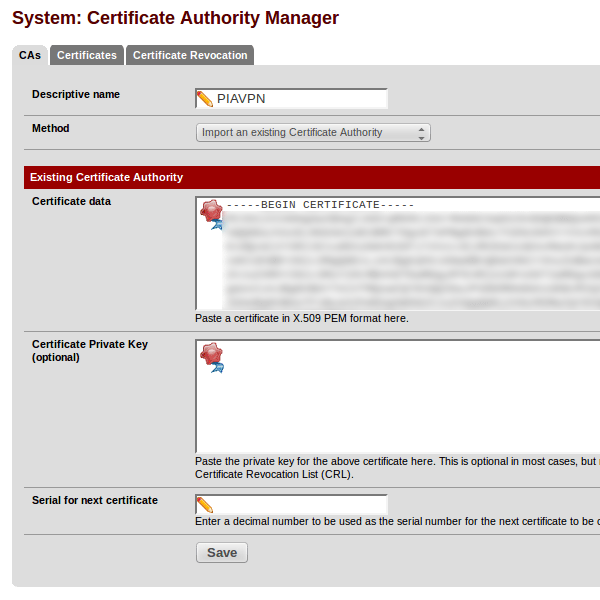
Create CA Certificate
- Select menu item: System->Cert Manager
- Select CAs tab
- Click Plus symbol to add CA Certificate
- Configure as follows:
- Descriptive name = PIAVPN
- Method = Import an existing Certificate Authority
- Certificate data = (copy/paste your ca.crt certificate provided by PIA)
—–BEGIN CERTIFICATE—–
.
.
.
—–END CERTIFICATE—– - Certificate Private Key = (leave blank)
- Serial for next certificate = (leave blank)
- Click Save
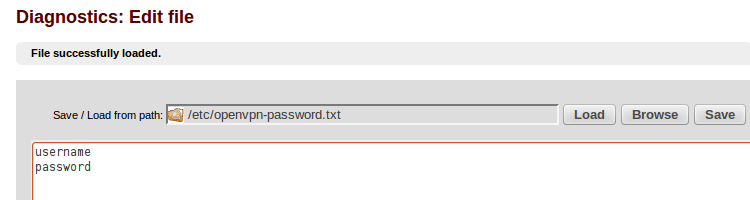
Create Password File
- Select menu: Diagnostics->Edit File
- Enter the following in the Save/Load from path: /etc/openvpn-password.txt
- Add the following two lines in the text box, substituting your username and password provided to you by PIA:
username
password - Click the Save button
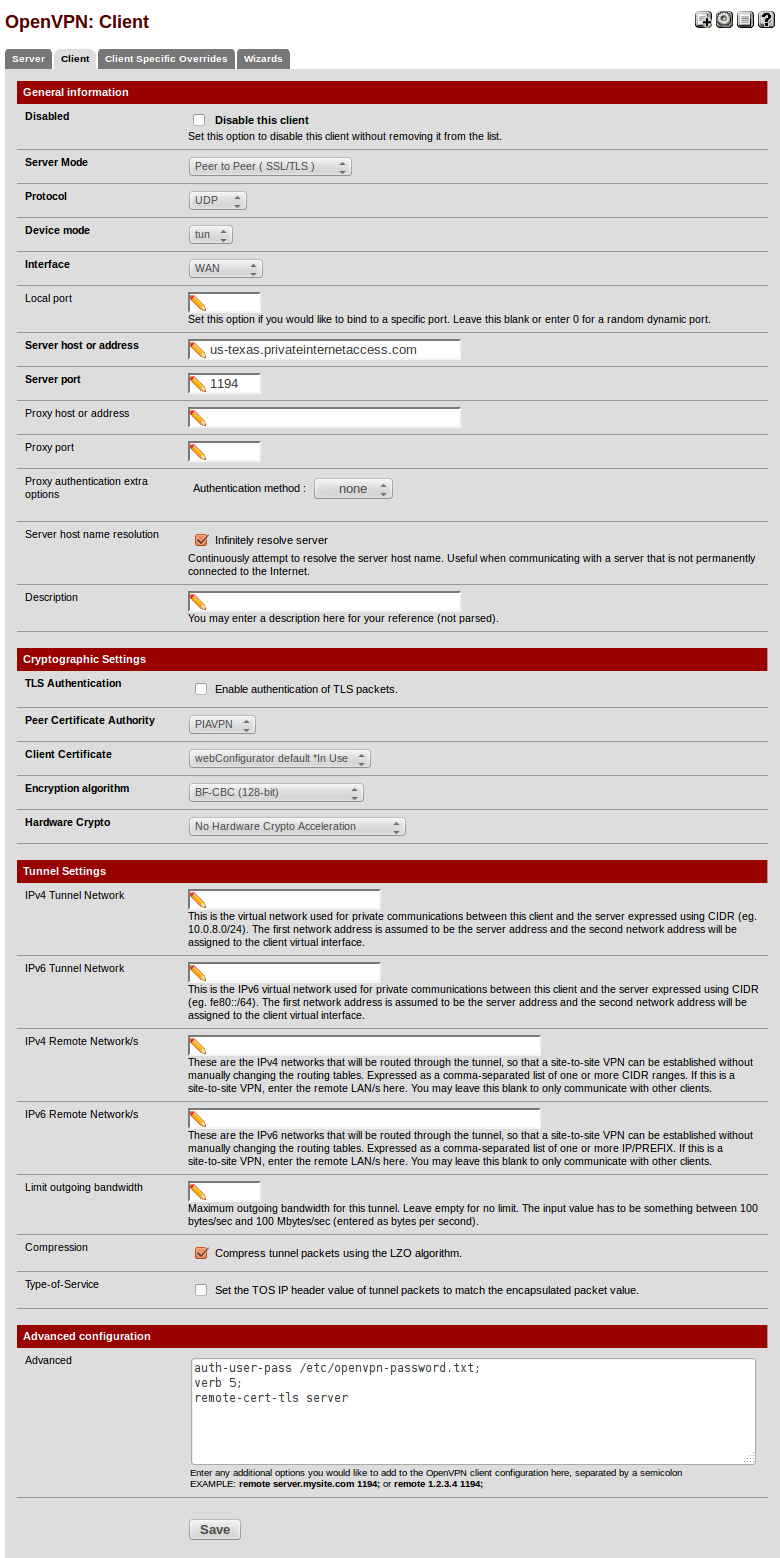
Create OpenVPN Client
- Select menu: VPN->OpenVPN
- Select Client tab
- Click Plus symbol to add client
- Configure as follows:
- Disabled = unchecked
- Server Mode = Peer To Peer (SSL/TLS)
- Protocol = UDP
- Device Mode = tun
- Interface = WAN
- Local Port = (leave blank)
- Server host or address = us-texas.privateinternetaccess.com (or any server you choose that PIA offers)
- Server Port = 1194
- Proxy host or address = (leave blank)
- Proxy port = (leave blank)
- Proxy authentication extra options = none
- Server host name resolution = checked, Infinitely resolve server
- Description = PIA OpenVPN (or whatever you desire)
- TLS Authentication = unchecked, Enable authentication of TLS packets
- Peer Certificate Authority = PIAVPN
- Client Certificate = webConfigurator default *In use
- Encryption algorithm = BF-CBC (128-bit)
- Hardware Crypto = No Hardware Crypto Acceleration
- IPv4 Tunnel Network = (leave blank)
- IPv6 Tunnel Network = (leave blank)
- IPv4 Remote Network/s = (leave blank)
- IPv6 Remote Network/s = (leave blank)
- Limit outgoing bandwidth = (leave blank)
- Compression = checked, Compress tunnel packets using the LZO algorithm
- Type-of-Service = unchecked
- Advanced = (enter the following into the text field, one item per line with a semi-colon separating each)
auth-user-pass /etc/openvpn-password.txt;
verb 5;
remote-cert-tls server
- Click the Save button
Create OpenVPN interface
- Select menu: Interfaces->(assign)
- Click the Plus button to add new interface. The new interface will be named OPT1 with a network port of ovpnc1().
- Click on OPT1 to edit the interface
- Configure as follows:
- Enabled = checked
- Description = PIAVPN
- IPv4 Configuration Type = none
- IPv6 Configuration Type = none
- MAC address = (leave blank)
- MTU = (leave blank)
- MSS = (leave blank)
- Block private networks = unchecked
- Block bogon networks = unchecked
- Click the Save button
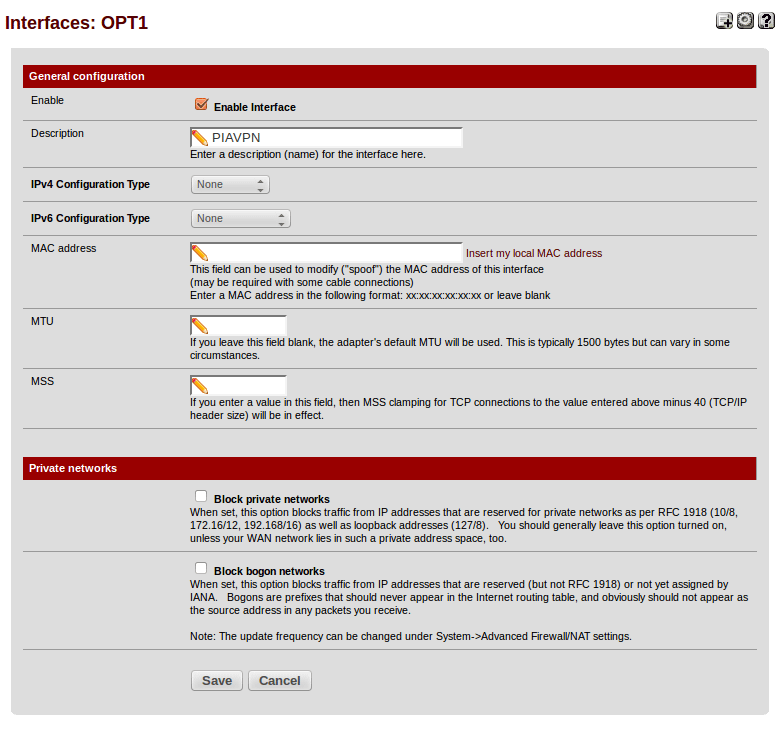
- On new page, click Apply Changes
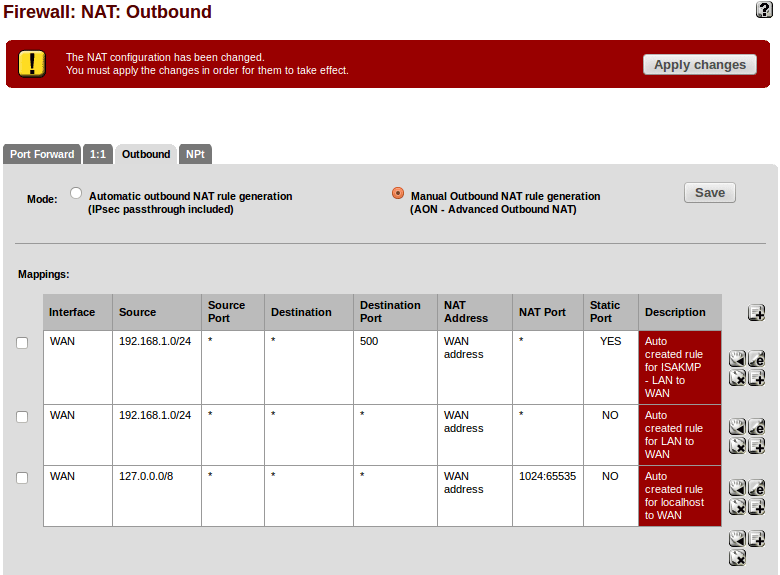
Configure NAT Rules
- Select menu: Firewall->NAT
- Select Outbound tab
- Check the radio button: Manual Outbound NAT rule generation (AON – Advanced Outbound NAT)
- Click the Save button
- At this point, automatic rules that were in use in Automatic outbound NAT will be generated. It will look like the following, with the exception that the source IP subnet will match your LAN IP subnet.
- The next step is to duplicate each of these rules, but change the NAT Address from WAN to PIAVPN. Start with the first rule by clicking the Plus sign immediately to the right of the line “to add a new NAT based on this one.” A new page will open. Configure as follows:
- Do not NAT = unchecked
- Interface = PIAVPN
- Protocol = (do not change)
- Source = (do not change)
- Destination = (do not change)
- Translation = (do not change)
- No XMLRPC Sync = (no dot change)
- Description = Auto created rule for ISAKMP – LAN to PIAVPN
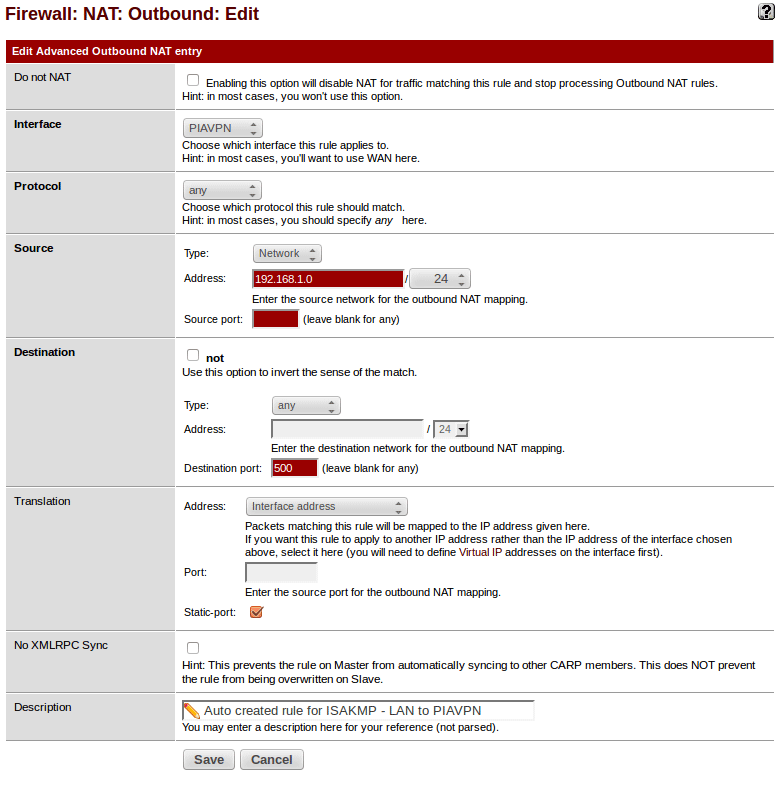
- Click the Save button
- Repeat this process for the other two rules. When completed, it should resemble the following:
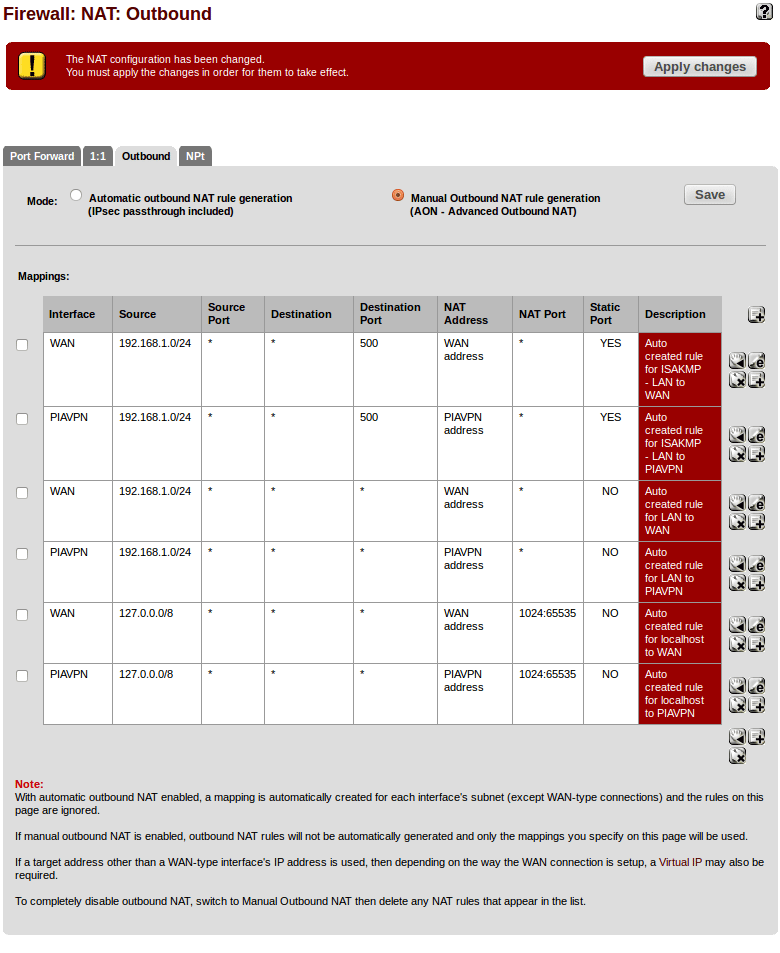
- Finally, click the Apply Changes button
Verify OpenVPN Service
At this point, your system is configured. The only thing you may need to do is restart your OpenVPN Service.
- Select menu: Status->OpenVPN
- Status should be UP (but it may be DOWN)
- My recommendation is to click on the Restart OpenVPN Service button no matter what the status is. It’s the middle button to the right of the service.
Verify OpenVPN Logs:
- Select menu: Status->System Logs
- Click on OpenVPN tab
- Look for confirmation in your logs:
openvpn[65701]: Initialization Sequence Completed
A few other observations to make:
- Select menu: Status->Dashboard
- Your PIAVPN interface should be listed under Interfaces and have an IP address. I have found that after initial configuration, you may need to restart the OpenVPN service
- With a client on the LAN, use a browser and go to ifconfig.me
- The IP address stated should be the public IP of PIA’s server, not your WAN IP
Explanation
Now that we have the VPN up and running, allow me to explain a few things.
verb 5;
When I setup the OpenVPN client, you will have noticed that I added an advanced directive: verb 5. This advanced setting is simply used to increase the verbosity of the OpenVPN log files. This is a personal preference and you can adjust accordingly. However, as I continue to explain a few things, I’ll reference the log files. Without this advanced directive, your log files will differ and you may not see the same logs that I reference.
remote-cert-tls;
Another advanced directive I configured was: remote-cert-tls. This advanced setting is used to prevent Man-In-The-Middle attacks, and the server needs to be configured properly for this to work, which Private Internet Access servers are.
Quoting from OpenVPN manual:
--remote-cert-tls client|server
Require that peer certificate was signed with an explicit key usage and extended key usage based on RFC3280 TLS rules.
This is a useful security option for clients, to ensure that the host they connect to is a designated server.
Also from OpenVPN manual:
This is an important security precaution to protect against a man-in-the-middle attack where an authorized client attempts to connect to another client by impersonating the server. The attack is easily prevented by having clients verify the server certificate using any one of --remote-cert-tls, --tls-remote, or --tls-verify.
Thus, ‘remote-cert-tls server‘ means that the certificate has “TLS Web Server Auth” as an extended property.
So when configuring your OpenVPN client with this directive, take a look at your logs. You will see the following lines that validate and verify the certificate. Without this advanced setting, these lines will not be in your logs and this validation is not performed:
openvpn[65701]: Validating certificate key usage
openvpn[65701]: ++ Certificate has key usage 00a0, expects 00a0
openvpn[65701]: VERIFY KU OK
openvpn[65701]: Validating certificate extended key usage
openvpn[65701]: ++ Certificate has EKU (str) TLS Web Server Authentication, expects TLS Web Server Authentication
openvpn[65701]: VERIFY EKU OK
openvpn[65701]: VERIFY OK: depth=0, C=US, ST=OH, L=Columbus, O=Private Internet Access, CN=server, emailAddress=secure@privateinternetaccess.com
Routing
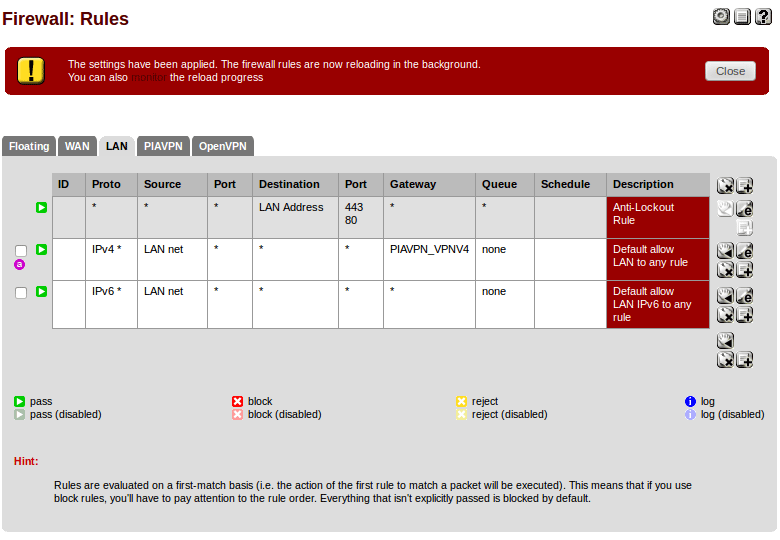
In some tutorials I found, I was instructed to configure my Firewall LAN rules with an advanced setting to specifically choose my Gateway. I found that this wasn’t necessary be default with a base installation of pfSense. It’s only necessary with more advanced firewall configurations. The following image is how the default firewall rules are for the LAN.
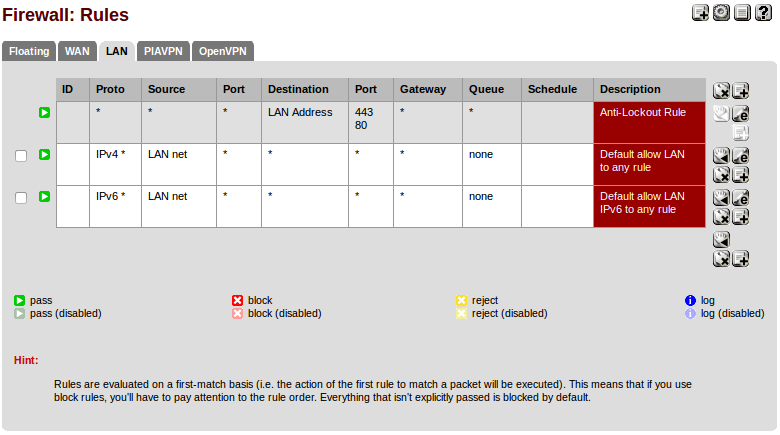
Take note of the middle rule for IPv4 protocol. This is the default “Allow All” rule that says that any Source IP with any Port is allowed to go to any Destination IP to any Port on any Gateway. With this rule, the decision of which Gateway(interface) to use, WAN or PIAVPN, is made via the system routing table. Now we can override this so that we force LAN traffic to use a specific gateway. As an example, do the following:
- Click on the Edit button for this default “Allow All” rule. (The button with lower-case ‘e’ to the right of the rule.)
- Scroll all the way to the bottom to the Advanced Features section.
- Click the Advanced button next to Gateway.
- Change the dropdown box to PIAVPN_VPN4
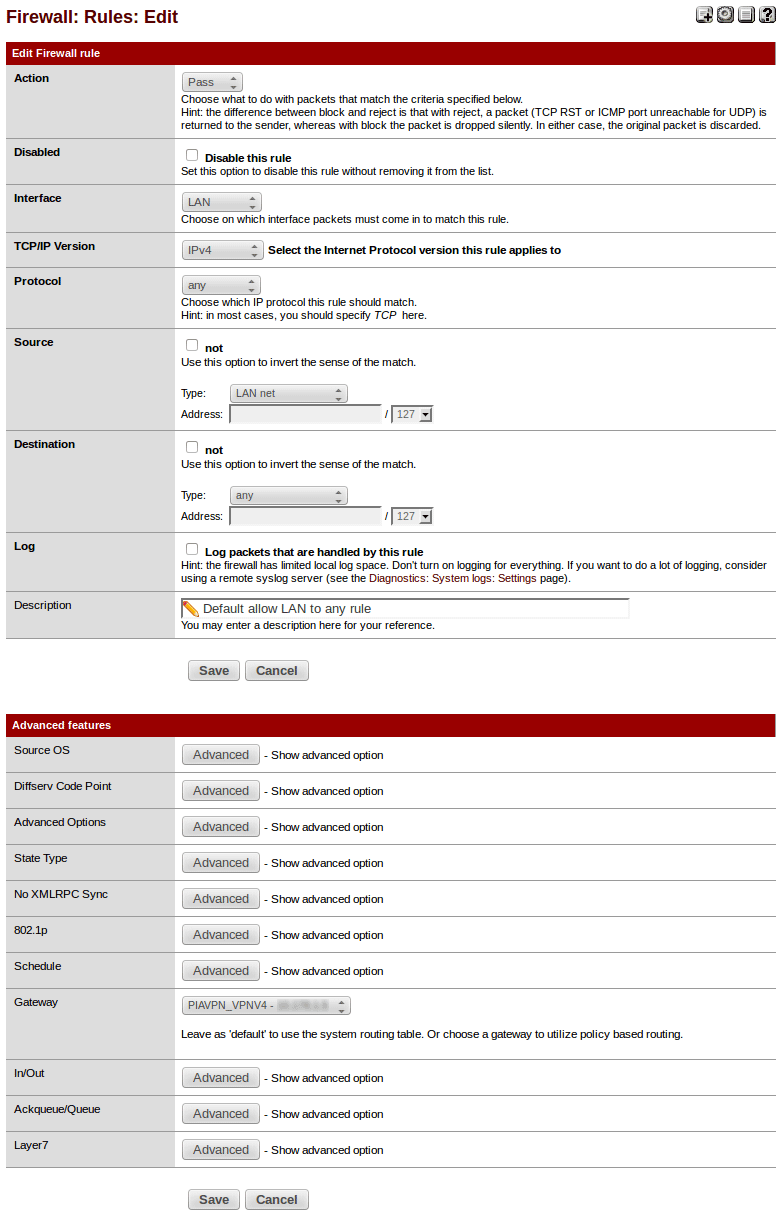
- Click Save.
- You’ll return to Firewall->Rules->LAN tab. Click the Apply Changes button.
Now that this has changed, you’ll see that your OpenVPN Gateway has been specified for this rule, and this means that all LAN traffic bypasses the system routing table and always goes out your OpenVPN interface to the Private Internet Access server.
Now I want to point out that we haven’t made the VPN function any differently. All we’ve done is force LAN traffic out the VPN interface instead of having the system routing table make that same decision for us. Why would we want to do this? Well, by creating specific rules for your firewall, you can then force certain clients out the VPN or out the WAN or whatever you want to do. This is just one more tool to allow you to control the firewall exactly how you want.
Manual Outbound NAT
If you were setting up your own peer-to-peer VPN and you had control of both the VPN Server and VPN Client, then you wouldn’t need to NAT the client-side LAN subnet to the VPN tunnel IP as we’re doing in this tutorial. Instead, you would use routing and NAT on the server to achieve your goal of reaching the internet through the VPN Server. Obviously, we have no control of PIA’s servers. Additionally, PIA doesn’t know the specific subnet we’re using on our LAN so that they can configure their servers to route and NAT our traffic out their public IP. Instead, they route and NAT the VPN tunnel IP, because that’s what they have control over. This is why we have to create an OpenVPN interface, which the VPN tunnel IP attaches to, and NAT our LAN traffic to it. In the end, this is a double-NAT situation, once from LAN-to-VPN-tunnel-IP on the VPN Client, and again from VPN-tunnel-IP-to-public-IP on the VPN Server.
As you’ll recall, we configured our Outbound NAT rules manually. These rules are what NATs our LAN subnet to the VPN tunnel IP. But why do we have to manually configure these rules? Why aren’t they automatically created?
With versions of pfSense prior to 2.1.1, it wasn’t necessary to manually configure the NAT rules as we’ve done. However, the configuration change from Automatic Outbound NAT to Manual Outbound NAT was still required. It’s just that prior to 2.1.1, the necessary rules you needed to get your LAN subnet NAT’ed to your VPN tunnel IP were automatically created for you when you made this change to Manual Outbound NAT – as odd as that may sound.
So you may be wondering, “Why are NAT rules automatically created in Manual mode but not in Automatic mode? Isn’t this a break in logic?” I thought the same, so I posted my questions to the pfSense forum in the hopes of discovering why. The funny thing is, I got my answers, but the end result was a change in code starting with version 2.1.1 which requires manual configuration for Outbound NAT to OpenVPN interfaces.
To put it simply, prior to version 2.1.1, Automatic Outbound NAT rules skipped OpenVPN interfaces, yet these interfaces were still considered when automatically creating the first set of manual rules. Starting with version 2.1.1, the code was since been changed so that OpenVPN interfaces are also skipped when automatically creating the first set of manual rules. Here is the bug submission at Redmine if you want further clarification.